Detecting AcTags
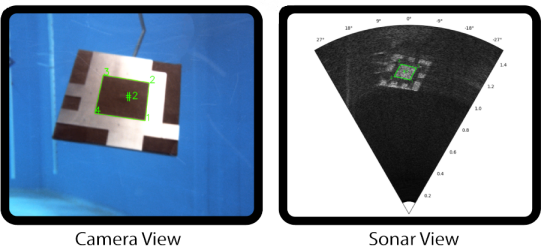
AcTags are fiducial markers that can be detected through both light and sound. Detection through light is achieved by taking advantage of the contrast between the dark acoustic foam and the light aluminum surface, which enables an AcTag to be seen by a camera. Detection through sound, on the other hand, is accomplished by the contrast of the scattering effects between rough and smooth surfaces. The rough surface of the acoustic foam generates high intensity returns even when the AcTag is not perpendicular to the sound wave. However, the smooth aluminum surface only reflects high intensities when it is perpendicular to the sonar, thus producing regions of light and dark pixels in the sonar that allow the AcTag to be detected.
The actag repository and apriltag repository can be used to detect AcTags in a sonar and camera, respectively. To detect an AcTag in a sonar view, see Detecting AcTags with a Sonar. To detect AcTags in a camera view, see Detecting AcTags with a Camera.
Detecting AcTags with a Sonar
Prerequisites
Ensure that you have installed and can use the AcTag library. If you have not already done so, then please refer to the installation instructions
Usage
Once an AcTag has been captured in a sonar image, you can use the AcTag class to detect it. The {meth}run_detection method takes a sonar image as input, and returns a list of all the detected tags. For each tag, the tag id, corner indices, and corner range and azimuth values will be returned. Follow the steps below to use the AcTag class:
Import the
AcTagclass:
from actag import AcTag
Initialize an AcTag object. See the
AcTagclass for information on the parameters. For example:
actagDetector = AcTag(min_range=0.1, max_range=1.5, horizontal_aperture=1.0472,
                      vertical_aperture=0.20944, tag_family="AcTag24h10",
                      tag_size=0.130628571428644)
NOTE: If you are using an AcTag family that you generated yourself, you will need to pass the path to the AcTag family file in the tag_family parameter instead of the AcTag family name. For example:
tag_family="/home/user/actag/actag_families/generated_families/AcTag24h4.java"
Import the sonar image.
my_sonar_image = cv2.imread("exampleSonarImage.png")
Call
run_detectionwith the sonar image. For example:
detected_tags = detector.run_detection(my_sonar_image)
Note that the sonar image should be a 2D numpy array with the format:
[[(0, 0),  ...,  (0, -1)],        [[(max_range, max_azimuth), ..., (max_range, min_azimuth)],
[    ...,  ...,    ...  ],   ->    [         ...,             ...,            ...,         ],
[(-1, 0),  ..., (-1, -1)]]         [(min_range, max_azimuth), ..., (min_range, min_azimuth)]]
You can also run the detection algorithm with a visualization of each step using visualize_detection. For example:
detected_tags = detector.visualize_detection(my_sonar_image)
Parse the results.
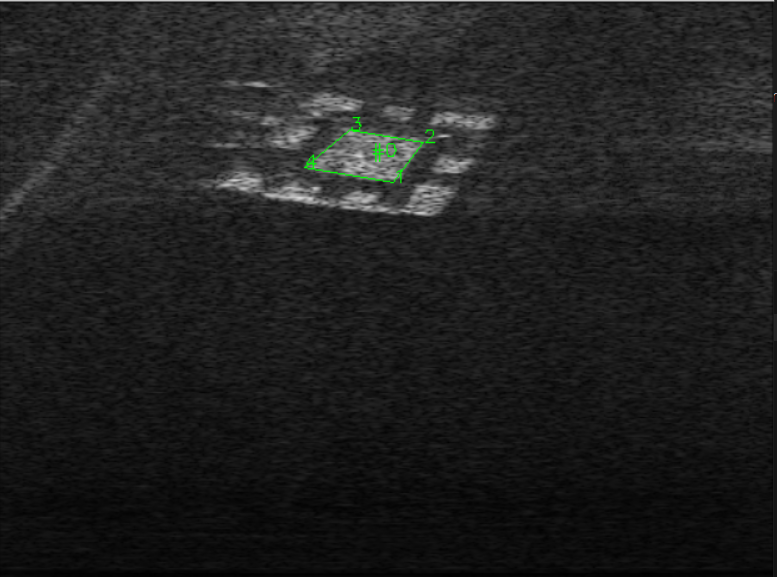
detected_tagswill be a list of each of the detected tags. Each detected tag is a list of the form[tag_id, corner_indices, range_and_azimuth_values].tag_idis an integer value indicating the tag ID in the specified tag family.corner_indicesis a 2D numpy array containing[row, column]pairs for each of the four corners of the tag. The top-left tag corner is first, followed by the top-right, and around in a clockwise fashion. Note that “top-left” refers to the corner in the top-left of the AcTag’s image file, not the corner which happens to appear in the top-left of the current sonar image.range_and_azimuth_valuesis a 2D numpy array with[range, azimuth]pairs (in meters and radians, respectively) corresponding to each of the four corners, in the same order ascorner_indices.
Example Scripts
Quickstart
A basic example of AcTag detection can be found on the Quickstart page. It demonstrates how to use the AcTag class, parse the results, and plot the information on the original image.
Video Detection
The detect_actag_video.py script in the example_scripts folder is similar to the Quickstart example above, but expands upon it to use OpenCV’s VideoCapture class for continuous detection on a video feed.
Polar Plotting
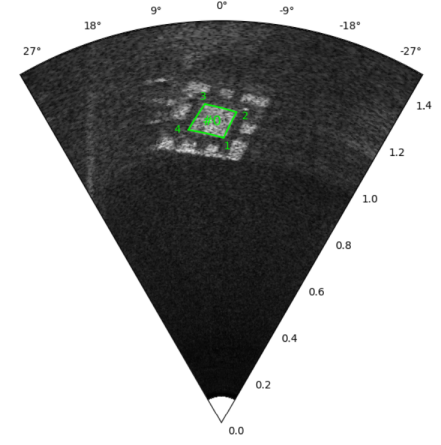
The detect_actag_polar_plotting.py script in the example_scripts folder is similar to the Quickstart example above, but plots the sonar image in a polar coordinate system instead of cartesian. It also uses the calculated range and azimuth values to plot the tag corners onto the image, instead of the pixel locations of the corners.
Detecting AcTags with a Camera
Setup
To detect an AcTag within a camera view, you’ll first need to import your AcTag family into the apriltag repository:
Download the apriltag repository and follow the installation/build instructions found in the README.md. NOTE: You may need to add
sudoto some of the commands in order for them to work.Find the C files generated for your AcTag family. These are located in the actag_files_for_apriltag directory under a folder with your family’s name.
Copy the .c and .h files and save them in the main directory of the apriltag repository.
Find the apriltag_pywrap.c file in the apriltag repository, and open it.
Add an include statement for the .h file you just copied into the apriltag repository. For example, if my tag family’s name was “AcTag24h10”, my .h file would be named “tagAcTag24h10.h”, and I would include the following line into the apriltag_pywrap.c file:
#include "tagAcTag24h10.h"
Find the following #define statement in the apriltag_pywrap.c file:
#define SUPPORTED_TAG_FAMILIES(_)
    _(tag9h2)                               \
    _(tag36h10)                             \
    _(tag36h11)                             \
    ...
Append a line with your tag family’s name onto the end of this define. For example, if my tag family’s name was
AcTag24h10, I would append the following line onto the end of the define:
_(AcTag24h10) \
Now that your AcTag family is imported into the apriltag repository, you are ready to detect AcTags with the apriltag class.
Usage
The apriltag class can be used to detect AcTags as AprilTags. The detect method takes a camera image as input, and returns a list of all the detected tags. Follow the steps below to use the apriltag class:
Import the
apriltagclass:
from apriltag import apriltag
Initalize the
apriltagclass with the AcTag family name:
detector = apriltag("AcTag24h10")
Import your AcTag image in greyscale, and invert the colors so that it becomes a valid AprilTag:
import cv2
import numpy as np

image = cv2.imread("exampleCameraImage.png", cv2.IMREAD_COLOR)
imageGrey = cv2.cvtColor(image, cv2.COLOR_BGR2GRAY)
imageInv = np.invert(imageGrey)
Run the
detectmethod on the color-inverted image:
detected_tags = detector.detect(imageInv)
NOTE: If you want to extract the AcTag’s pose, you’ll need to pass some additional parameters to the detect method. See the links below for more information.
Parse the results.
detected_tagswill be a list of tags, with each tag as a dictionary. Each tag dictionary will contain the tag ID (id), the center coordinates in pixel space (center), the locations of the four corners in pixel space (lb-rb-rt-lt), the margin (margin), and the hamming distance of the detected data bits from the decoded tag (hamming). Note that thelb-rb-rt-ltvariable orders the corners by starting with the left-bottom corner, and going around the edge of the tag counter-clockwise. This is different than what theAcTag.run_detectionmethod returns: the corners are ordered starting with the left-top corner, and going around the edge of the tag clockwise. If you also enable pose detection with thedetectmethod, there will be additional results with pose information. For more information on these values, see the links below.
For more information on using the apriltag class to detect AprilTags, see the AprilTag User Guide. You may also consider referring to the alternative library of Python bindings for AprilTag called lib-dt-apriltags. While the Python bindings in this library are not an exact match with AprilTag, they exhibit a close resemblance. Therefore, consulting the documentation of lib-dt-apriltags can prove useful.
Example Script

The detect_actag_with_apriltag.py script in the example_scripts folder gives an example of how to use the apriltag class to detect an AcTag in Python. It also demonstrates how to parse the results and plot the information on the original image.