Constructing AcTags
Once you’ve picked an AcTag family to use, you can begin constructing physical AcTags. AcTags were designed to be cheap and easy to manufacture. Below is the AcTag Bill of Materials for a 1’ tag and a 2’ tag:
Material |
Unit Cost |
Materials for 1’ AcTag |
Materials for 2’ AcTag |
Provider |
Link |
|---|---|---|---|---|---|
1 mm Aluminum Sheet (5052 or 6061) cut w/Tag Design |
Varies, but there is a $30 order minimum |
1 Cut sheet (~$10) |
1 Cut sheet (~$45) |
SendCutSend |
|
1/2” Acoustic Foam (18” by 24”) |
$10.98 for 1 piece |
12” by 12” square, or 1/3 of a unit ($3.66) |
24” by 24” square, or 4/3rd of a unit ($14.66) |
Sonic Barrier / Amazon |
https://www.amazon.com/Sonic-Barrier-Acoustic-Foam-PSA/dp/B0007XFBE0 |
1’ by 1’ Thick Aluminum ACM Sheet |
$6.92 for 1 sheet |
1 unit ($6.92) |
N/A |
Home Depot |
|
2’ by 2’ Thick Aluminum ACM Sheet |
$23.28 for 1 sheet |
N/A |
1 unit ($23.28) |
Home Depot |
|
#6 x 1 in. inch Metal Screws |
$1.38 for 10 screws |
4 screws, or 2/5th of a unit ($0.60) |
8 screws, or 4/5th of a unit ($1.20) |
Home Depot |
|
#6-32 Steel Cap Nuts |
$1.97 for 25 nuts |
4 nuts, or 4/25th of a unit ($0.32) |
8 nuts, or 8/25th of a unit ($0.64) |
Home Depot |
https://www.homedepot.com/p/6-32-Zinc-Plated-Steel-Acorn-Cap-Nuts-25-Pack-9077023/310518794 |
1/2” Steel Spacers |
$4.37 for 5 spacers |
4 spacers, or 4/5th of a unit ($3.50) |
8 spacers, or 8/5th of a unit ($6.99) |
Home Depot |
Note that all monetary values are in U.S. dollars. The products specified may only be available in the United States, so costs may vary depending on your region. Also note that manufacturing a single tag (instead of in bulk) will likely result in a higher cost, as there will be leftover unused materials. When manufacturing multiple 1’ AcTags, the cost per tag is around $35, and when manufacturing multiple 2’ AcTags, the cost per tag is around $124.50.
Use the AcTag BOM to buy the materials for your AcTag. Decide whether you want a 1’ tag or a 2’ tag, and then purchase the number of units necessary to built it. If a specific material is out-of-stock or not available in your region, feel free to find substitutes that fulfill the same specifications of the original product.
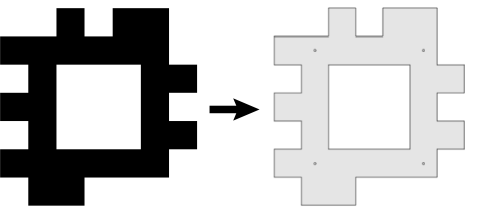
To order the 1 mm Aluminum Sheet (5052 or 6061) cut w/Tag Design, you’ll need to provide a .dxf file containing the shape of the black pixels on your AcTag. Refer to Picking an Actag Family for information on acquiring image files for the AcTags in your chosen family, and use the corresponding image to recreate the black tag face using CAD software. Note that if there are any “floating” data bits in the corners of your AcTag, you will need to connect these to the rest of the AcTag face in your CAD design. You can also add holes for screws to this CAD file, as explained in step #1 of the tag construction process below. Export this file to .dxf format, and it will now be ready for cutting with SendCutSend. Below is an example of an AcTag image file along with it’s corresponding .dxf file:
Note that although ordering through SendCutSend is a convenient option, there may be cheaper alternatives. For example, buying uncut sheets of aluminum and having them cut using a water jet could allow you to manufacture AcTag faces at a lower cost. However, this will depend on the availability and cost of these services and materials in your area. Feel free to use any method you like to manufacture your AcTag faces.
Once you have the materials, follow the instruction below to build your AcTag:
Drill holes in the
1 mm Aluminum Sheet (5052 or 6061) cut w/Tag Design, which I’ll refer to as the “tag face”. The holes should have a diameter of around 0.138” (9/64”) so that the#6 x 1 in. inch Metal Screwswill fit in them. For 1’ tags, you’ll need four holes for each of the corner black pixels. For 2’ tags, you’ll need four holes for each of the corner black pixels, and four more holes that are in-between the corner holes.Take the
Thick Aluminum ACM Sheet(which I’ll call the “tag back”) and put it behind the tag face. Line them up so that the edges of the tag back match up with the edges of the data bits on the tag face. Then, drill holes in the tag back to match the holes in the tag face. Make sure that the holes line up between both sheets.Take the
1/2" Acoustic Foamand use an electric knife to cut it to the size of the tag back. Line up the edges of the acoustic foam with the edges of the tag back. If the acoustic foam comes with sticky adhesive, you can attach the foam to the tag back.Using the holes in the tag back as a guide, make holes in the acoustic foam for the
1/2" Steel Spacers. Slot a steel spacer into each hole.Re-align the tag face with the tag back (with the acoustic foam and steel spacers in between). Use the
#6 x 1 in. inch Metal Screwsand the#6-32 Steel Cap Nutsto connect the tag face to the tag back. The screws should be put through the tag face, with the cap nuts on the tag back.
Congratulations, your AcTag is complete! It is ready to be viewed by a sonar and a camera, so feel free to start capturing footage of your AcTag. When you are ready to detect your AcTag with an imaging sonar or camera, see Detecting AcTags for more information.